Connection Pool
: 로딩 -> 연결 -> 접근 -> 실행 -> 해제 반복
Connection 객체를 생성하고 해제하는 동안 많은 시스템 자원이 소모된다
서버에 미리 Connection 객체를 설정해 놓은 것
DB와 연결된 Connection 객체를 미리 만들어 놓고 Pool 속에 저장해두고 있다가
요청이 있을 때마다 가져다 사용하고 반환하는 기법
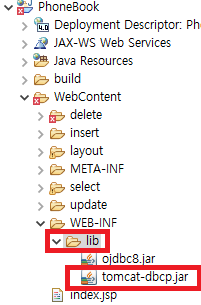
jar 파일 추가 -> WEB-INF ->lib
Server 설치폴더 안에 기본 제공
-> lib-> tomcat-dbcp.jar
인터넷에서 다운받는 경우
-DBCP, POOL, Collections
* 다운로드 페이지
https://commons.apache.org/proper/commons-collections/download_collections.cgi
Collections – Download Apache Commons Collections
Download Apache Commons Collections Using a Mirror We recommend you use a mirror to download our release builds, but you must verify the integrity of the downloaded files using signatures downloaded from our main distribution directories. Recent releases (
commons.apache.org

Tomcat 9.0 > lib > tomcat-dbcp

JSP 프로젝트 파일 내에서 WEB-INF > lib 폴더에 복사 붙여넣기
.xml파일
: HTML이 가지고 있는 태그의 한계를 극복함으로써 여러 가지 사용자정의태그를 만들 수 있는 파일
웹이나 앱에서는 데이터 및 구조화된 문서들을 위한 표준이 된다
주로 설정할 때 사용된다
context.xml
: Connection Pool의 설정을 하는 파일(세부 설정 내역)
META-INF안에 만든다
- name : 설정을 구별할 수 있는 이름
- auth
- type : 사용할 클래스의 타입
- maxActive : 최대로 만들 connection 객체의 수
- maxIdle : 기본적으로 생성할 객체의 수
- maxWait : 기다리는 시간 ; -1 무한대기
- whenExhustedAction : 커넥션이 없을 때 어떻게 행동할지 정하는 옵션
0 : 에러발생
1 : 객체가 생길대까지 기다렸다 쓴다
2 : 객체를 생성해서 쓴다
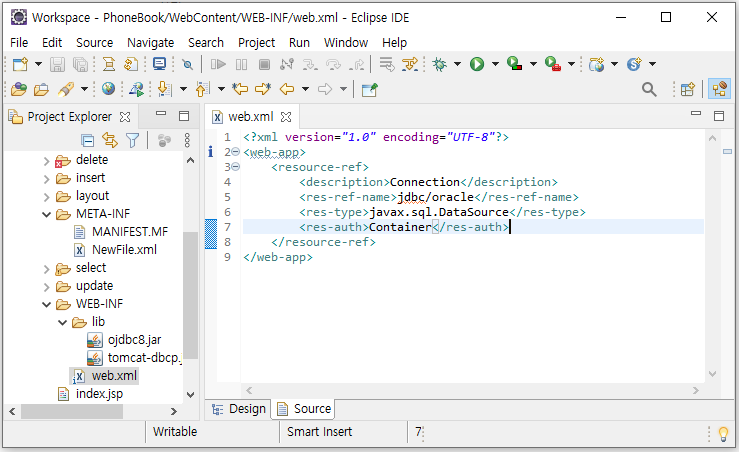
web.xml
: Server에 설정한 것들을 알려주는 파일(설정 list)
WEB-INF안에 만들면 된다
STEP1 파일 생성 및 소스 입력

META-INF 마우스 오른쪽버튼 > New > Other

XML > XML File 생성

* connection pool 설정

META-INF > .xml 파일 > Source
<Context>
<Resource name = "jdbc/oracle"
auth = "Container"
type = "javax.sql.DataSource"
driverClassName = "oracle.jdbc.OracleDriver"
url = "jdbc:oracle:thin:@localhost:1521:xe"
username = "c##phonebook"
password = "oracle"
maxActive = "20"
maxIdle ="3"
maxWait = "-1"
/>
</Context>
드라이버 로딩까지 이 작업으로 설정이 완료된다

WEB-INF > lib 파일 > .xml 파일 생성 > Source
<web-app>
<resource-ref>
<description>Connection</description>
<res-ref-name>jdbc/oracle</res-ref-name>
<res-type>javax.sql.DataSource</res-type>
<res-auth>Container</res-auth>
</resource-ref>
</web-app>
STEP2 JAVA 소스 : DAO수정
public infoDAO () {
try {
Class.forName("oracle.jdbc.OracleDriver");
} catch (ClassNotFoundException e) {
e.printStackTrace();
}
}
private void getConnection() {
String url = "jdbc:oracle:thin:@localhost:1521:xe";
String user = "c##phonebook";
String password = "oracle";
try {
con = DriverManager.getConnection(url, user, password);
} catch (SQLException e) {
e.printStackTrace();
}
}
해당 코드를 삭제하고 아래 코드로 대체
private static DataSource ds;
static {
try {
Context context = new InitialContext(); // javax.naming의 context
ds = (DataSource)context.lookup("java:comp/env/jdbc/oracle");
// java:comp/env/ Tomcat 사용 시 설정들이 저장되어 있는 경로
} catch (NamingException e) {
e.printStackTrace();
}
}
try ~ catch문에서
this.getConnection();코드를
con = ds.getConnection(); 으로 변경
singleton 패턴
프로그램에서 단 하나의 인스턴스 공간을 만들고 그 공간을 지속적으로 이용하려고 할 때 사용
시스템 자원 소모를 줄이기 위해 사용
private static ClassDAO instatnce;
private static ClassDAO instance = new ClassDAO();
private ClassDAO () {
}
public static ClassDAO getInstance () {
return instance;
}
public static ClassDAO getInstance () {
if(instance == null) {
instance = new ClassDAO();}
return instance;
}
=>
ClassDAO dao = new StudentDAO();
를 아래와 같이 변경
-> ClassDAO.getInstance();
'Backend > JSP' 카테고리의 다른 글
| JSP 웹의 영역과 속성 (0) | 2023.04.25 |
|---|---|
| JSP Eclipse 페이지 이동 방식 : redirect, forward (0) | 2023.04.05 |
| JSP Eclipse 파라미터 값의 데이터 전송 방식 : get, post (0) | 2023.04.04 |
| JSP Eclipse 내장 객체 (0) | 2023.04.04 |
| JSP Eclipse 구구단 테이블 예시 풀이 (0) | 2023.04.03 |